
This is the second post in the #DitchYourPlanner series. In the other posts, we covered why you might want to change from paper to digital planning and my favorite digital planning tools. In this post, we’ll cover the mistakes, the secrets to success and step by step instructions to make the switch.
 I tried several times in the past to switch from paper to digital planning, but I couldn’t get it to stick. I’d do good for a few days, maybe even a couple of weeks. But then a few days, and definitely a couple of weeks, would go by when I forgot about it. I didn’t take time to look at my new digital planning systems and then I was hopelessly done for again.
But as I had some life circumstances that made switching from paper to digital almost a necessity, I took a closer look at what I had tried before. I found three crazy mistakes I was making. If you’ve tried to make the switch, I bet you’ve made these mistakes, too.
Mistake #1 Using someone else’s digital planning system
Making intentional plans for your days and weeks is a very personal process. It works best when we develop a system organically that suits our needs and personality, and what works for one person may be death to you. I’ll share how I did it, but you should take what feels right to you, and leave the rest.
For example, I use online tools and programs specifically made for planning, but they look nothing like a traditional paper planner. If that paper planner look and feel, with calendar grids, different sections and stickers for every event, motivates you to be intentional, then try a digital pdf loaded into a note-taking app, like this.
Mistake #2 Using unfamiliar digital planning tools
A lot of fancy digital tools can be used for planning, but if you don’t know how to use them, they have a steep learning curve. Evernote, OneNote, Trello, Asana, Airtable … all are great tools, but they take some time to learn. And when you are trying to put in place a new habit AND trying to learn new software at the same time, it can be frustrating.
Your phone probably already has built-in apps for a calendar, a to-do list (task list, reminder list) and notes. Most of them have ways to sync to your desktop or laptop computer. Use those to start simply, then as you find other functions you really need, find the tools that can do what you need.
Mistake #3 Switching from paper to digital planning all at once
This is the biggest mistake of all. Making a drastic, cold-turkey switch from one thing to another in any area of our lives rarely works. Our minds and muscles need time and space to develop new habits, and they can’t process a lot of changes at one time.
Try making one small change. Do it consistently until it has become a habit. Then make another small change. This takes time. It means you may not see much impact at first. But after weeks and months, you’ll have a new system that sticks, instead of another failed attempt.
So to sum up where we’ve been so far, I bet the last time you tried to switch from paper to digital planning looked like this:
You read a great blog post or book from an expert about their planning system. You downloaded (or even paid $$$ for) fancy software with all kinds of complicated bells and whistles. An entire Saturday is spent loading everything about your life into the fancy software and marveled at how productive you were going to be this week.
By Friday, you’d forgotten which tab your bill paying schedule was under. You realized your phone bill was three days overdue. And within two weeks, you haven’t looked at your calendar in five days. The babysitter’s phone number and your new client’s log-in info were mixed up. You realize this is working no better than your old paper way, maybe even worse. that’s when you give up and go back to whatever was half working before.
Am I right??
I only know that scenario because I lived it so many times. But I’ve finally broken the cycle and have a digital planning system that works for me. It has literally changed my life and brought such peace into the process of managing my busy, multi-passionate schedule and commitments. Here are my secrets for successfully making the switch.
Secret #1 Address your most painful spots first
Think about what’s not working for you now and where it is causing the most pain. If something is working, don’t try to fix it just for the sake of “going digital.” You may improve on it later, but when you are just starting out, work on the things that will make the most impact first.
 For me, that was my calendar. I was trying to keep all my appointments for work, business, volunteering, church and family all in my head. Of course, that was not working and I had many double-bookings and forgotten appointments.
On the other hand, for years, we’ve kept a yellow note pad on the kitchen counter where we jot down things we need at the grocery when we think of them. Then whoever is going to the store takes the list or snaps a picture of it. Our system could be better by have an online list we could add to or shop from if we are away from the house. But this is working for us now. So digitizing the grocery list is a low priority, no matter how many cools apps I find to do it.
Ask yourself what are you accomplishing by switching from paper to digital, and what areas are not working now. Then focus on those areas and see the big impacts first.
Secret #2 Use the tools you have
If you are like me, you aren’t using half the features you carry around in your pocket on your phone all the time.
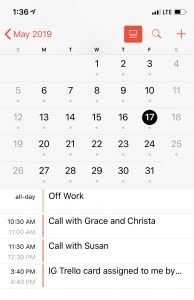
I’m amazed at all the things the calendar app can do on my phone. I use that as the “hub” for my schedule. My work Outlook calendar and my business/personal Google calendar are all synced to my phone. They are color-coded and I can turn them on and off if I want to see them or if I want to focus on just one area. Making better use of the calendars I already had made a huge difference in my biggest pain point.
The same is true of the Reminder (to-do list) and especially the Notes app. You can make checklists, add attachments, photos, tables and sketches, and even add grids for handwritten notes.
So use these familiar tools to start as you are developing your own system and only look for something more when they aren’t working for you any longer.
Secret #3 Visualize what digital planning would look like for you
How would digital planning fit into your daily life? Are you out in the sun all day where screens are hard to read? Are you at a computer most of the day so you can keep your digital planner open? Do you need everything syncable between multiple devices and with other team members?
Keep that vision in mind as you start incorporating digital planning into your routine.
I do my client calls using Zoom video conferencing, and I just can’t see myself typing on my laptop while I’m talking to them on the screen. Also, I often attend meetings by phone in places where I can’t get out my laptop. So digital note-taking is not something that would easily fit into my life. It’s near the bottom of the list of my digital plans.
Okay … so now we know what to do and what NOT to do. How do we get started?
A little at a time. Just one thing. That is the biggest secret of all. Pick your most painful spot, start there and develop a habit.
You won’t develop a habit if you just stick your toe in with one marginal thing in your life that you rarely use. Start with something that will make an immediate impact with daily use so you begin to rely more on your digital plans and less on your paper planner.
For most of us, that would be our calendar, to-do lists and weekly plan. Here is how I’ve switched those from paper to digital planning.
Step 1: Calendar – 3 – 4 weeks
Start by entering every appointment and scheduled task into your calendar. Every one. Every time. Include in the description important things you need to know for the appointment, like phone numbers, addresses, things you need to do before you go or bring with you. This gets you in the habit of typing these important notes in a searchable digital format instead of scribbling it in the corner of your planner page or on a sticky note.
Be sure to check your calendar last thing every evening, first thing every morning and do a complete look over the week at least once a week.
Step 2: To-Do List 2 – 3 weeks
Start simple by putting everything on your to-do list in some digital form. We’ll talk about different apps I use in the next post, but consider starting simply by using the Reminders or Tasks apps on your phone. Most allow you to assign a date to them and a color or category. Sort them to view what needs to be done on a certain date, or all the things you need to do for your book launch.
Step 3: Weekly Plan and Weekly Review 4 weeks
This is probably the most important step for making digital planning a real life-style, but it is hard to do if you aren’t already using your calendar and your to-do list well.
Your weekly plan will show all of your appointments for the week and which to-do items will be done each day in time blocks. Make your plan every week during a weekly review where you look at what got done last week, what needs to be done this week and any lessons you learned about your barriers or what is working well for you.
Implementing a digital weekly plan and review has been the single-most impactful thing I have done to gain peace and control over my schedule and responsibilities. “Pre-deciding” what will get done keeps me focused when other shiny objects want to distract me. And I never sit down to work without a plan for what I am going to do. It’s the secret answer to the most common question I get: “How do you do all the things you do?”
Step 4: Evaluate and Do It Again – 1 Week
At this point, you have made a significant switch from paper to digital planning. Take a step back and look at how it has gone. Are you happy with your software or ready to upgrade to something with more features? Are you seeing the benefits that you expected?
We often throw out the baby with the bathwater, instead of evaluating what IS working and tweaking it to make it better. Remember WHY you wanted to make this switch and keep tweaking until it suits you and feels natural. Then pick the next area that you want to make digital.
What will it be? Plans for a big project? Your daily prayer journal? A business hub with all your important info in one place? A blog or book plan? The possibilities are endless. The only rule is that you find the areas creating the most pain and frustration for you and create a digital system to solve them. As you see the pain and frustration ease, you’ll be more motivated to stick with it as it becomes a natural habit.
 Ready to make the switch?
 Ready to make the switch?
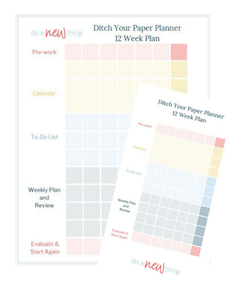
I created a special tracker you can use to create your new digital planning habit. You can print it out and check off each day, or check it off digitally using your favorite pdf markup tool, or save the Stories version to share your progress on Instagram or Facebook. Use the hashtag #DitchYourPaperPlanner and I’ll cheer you on!


Is your to-do list out of control?
Grab my best to-do list tips and learn to overcome the de-railers in your week
